If you’re using Elementor to create custom loop grids or WooCommerce shop templates, you might want to enhance your pages with a dynamic sorting dropdown. This feature allows users to sort content based on their preferences, such as by popularity, price, or date. In this tutorial, we’ll guide you through creating a short code for a dynamic sorting dropdown and integrating it with both Elementor custom loop grids and WooCommerce shop templates.
Step 1: Creating the Shortcode
First, we’ll create a shortcode that generates a sorting dropdown form. This form will let users select their preferred sorting option, which will then be used to adjust the content displayed in your Elementor loop grids or WooCommerce shop.
function sorting_dropdown_shortcode() {
    // Get the current 'orderby' parameter from the URL query string
    $orderby = isset($_GET['orderby']) ? sanitize_text_field($_GET['orderby']) : 'menu_order';
    ob_start();    ?>
    <form class="woocommerce-ordering" method="get">
        <select name="orderby" class="orderby" aria-label="Sort order">
            <option value="menu_order" <?php selected($orderby, 'menu_order'); ?>>Default sorting</option>
            <option value="popularity" <?php selected($orderby, 'popularity'); ?>>Sort by popularity</option>
            <option value="rating" <?php selected($orderby, 'rating'); ?>>Sort by average rating</option>
            <option value="date" <?php selected($orderby, 'date'); ?>>Sort by latest</option>
            <option value="price" <?php selected($orderby, 'price'); ?>>Sort by price: low to high</option>
            <option value="price-desc" <?php selected($orderby, 'price-desc'); ?>>Sort by price: high to low</option>
            <option value="custom_sort" <?php selected($orderby, 'custom_sort'); ?>>Custom Sort</option>
        </select>
        <input type="hidden" name="paged" value="1">
    </form>
    <?php
    return ob_get_clean();
}
add_shortcode('sorting_dropdown', 'sorting_dropdown_shortcode');
This code creates a shortcode [sorting_dropdown] that generates a sorting dropdown form. The form captures the orderby parameter from the URL and ensures the correct option is selected based on this parameter.
Step 2: Implementing the Shortcode in Elementor
Add the Shortcode to Your Elementor Page
- Go to the Elementor page or template where you want to display the sorting dropdown.
- Add a Shortcode widget to the desired location above or near your loop grid or shop products.
- In the Shortcode widget settings, enter [sorting_dropdown].
This embeds the sorting dropdown form into your Elementor layout, allowing users to select their sorting preference.
Step 3: Modifying Elementor’s Query Based on Sorting
To make the sorting dropdown functional, you need to adjust Elementor’s query for your custom loop grid or WooCommerce shop based on the selected sorting option. This involves hooking into Elementor’s query and modifying it accordingly.
Add Query Modifications to functions.php
add_action('elementor/query/custom_sort_by', function($query) {
    // Get the sorting parameter from the URL
    $orderby = isset($_GET['orderby']) ? sanitize_text_field($_GET['orderby']) : 'menu_order';
    switch ($orderby) {
        case 'popularity':
            $query->set('meta_key', 'total_sales');
            $query->set('orderby', 'meta_value_num');
            $query->set('order', 'DESC');
            break;
        case 'rating':
            $query->set('meta_key', '_wc_average_rating');
            $query->set('orderby', 'meta_value_num');
            $query->set('order', 'DESC');
            break;
        case 'date':
            $query->set('orderby', 'date');
            $query->set('order', 'DESC');
            break;
        case 'price':
            $query->set('meta_key', '_price');
            $query->set('orderby', 'meta_value_num');
            $query->set('order', 'ASC');
            break;
        case 'price-desc':
            $query->set('meta_key', '_price');
            $query->set('orderby', 'meta_value_num');
            $query->set('order', 'DESC');
            break;
        default:
            $query->set('orderby', 'menu_order');
            $query->set('order', 'ASC');
            break;
    }
});
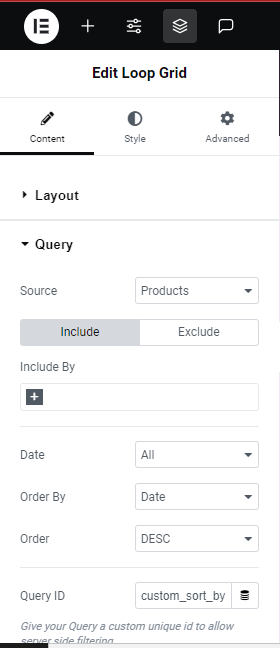
Step 4: Add Query ID
Add query ID in your loop grid as mentioned below.
Read Also :-
Introduction to Laravel Eloquent ORM
Create an alternate loop template
Also Visit :-