To add a Subscribe via Email Widget to Blogger is easy. In order to be able to add this widget you just need to be good at copy-pasting and should have some knowledge of blogger admin interface. Even if you are not that good at both you can still try while walking through the following steps with me.
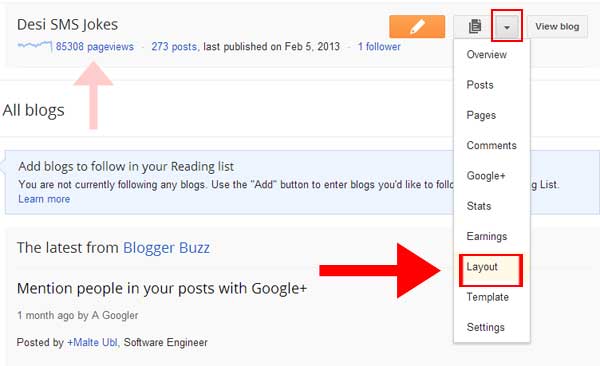
STEP ONE – Once you are logged in to your blogger account and you are on your blogger administration control panel i.e. http://www.blogger.com/home click on the down arrow next to note-book icon and then Layout from the dropdown list that appear on clicking the down arrow (See figure below). An alternate way to go to Layout is to click the xxxxx pageviews link and then click the Layout link shown at the left hand side menu of the following page but i shall not demonstrate it here as i prefer the former method shown in the figure below:
STEP TWO – On the Layout page find Add a Gadget link and click to open the gadget selection box. As shown in figure clicking Add a Gadget should open a popup window listing all available gadgets which can be installed on your blog (see figure below).
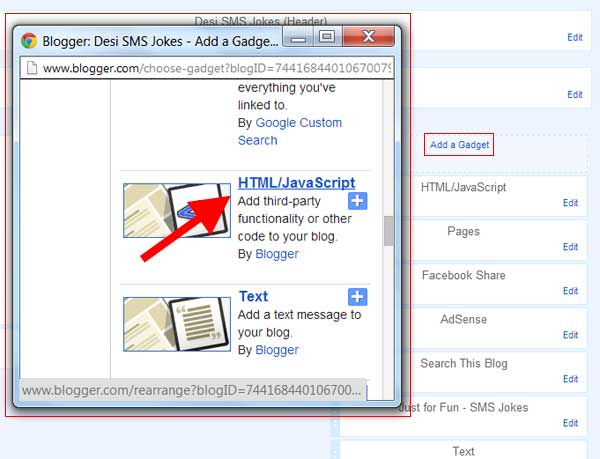
STEP THREE – Find and choose HTML/JavaScript Gadget by clicking the Title or the Add (plus) button next to Title of gadget. It should replace it with another popup box having two fields i.e. Title and Content in it. Skip Title field and place the following content in the Content field.
(Hint: To copy this content just mouse-over the code you see below. You should see ![]() . Click on the papers icon and the code should be copied to your clipboard.)
. Click on the papers icon and the code should be copied to your clipboard.)
[html]<style>
.hl-email{
background:url(http://3.bp.blogspot.com/-twfFb11IqHk/UNsXOBgv75I/AAAAAAAAA1M/lgj0HQ5cPGA/s1600/icon_mail1.png) no-repeat 0px 1px;
width:250px;
padding:0px 0px 0 65px;
float:left;
font: bold 16px ‘Trebuchet MS’, Trebuchet, Arial,Verdana, Sans-serif;
margin: 0px 0 10px 0;
color:#686B6C;
}
.hl-emailsubmit{
background:#9B9895;
cursor:pointer;
color:#fff;
border:none;
padding:3px;
text-shadow:0 -1px 1px rgba(0,0,0,0.25);
-moz-border-radius:6px;
-webkit-border-radius:6px;
border-radius:3px;
font:12px sans-serif;
}
.hl-emailsubmit:hover{
background:#E98313;
}
.textarea{
padding:2px;
margin:6px 2px 6px 2px;
background:#f9f9f9;
border:1px solid #ccc;
resize:none;
box-shadow:inset 1px 1px 1px rgba(0,0,0,0.1);
-moz-box-shadow:inset 1px 1px 1px rgba(0,0,0,0.1);
-webkit-box-shadow:inset 1px 1px 1px rgba(0,0,0,0.1); font-size:13px;
width:130px;
color:#666;}
</style>
<div class="hl-email">
Subscribe via Email <form action="http://feedburner.google.com/fb/a/mailverify" id="feedform" method="post" target="popupwindow" onsubmit="window.open(‘http://feedburner.google.com/fb/a/mailverify?uri=MyBlogFeedName’, ‘popupwindow’, ‘scrollbars=yes,width=550,height=520’);return true">
<input gtbfieldid="3" class="textarea" name="email" onblur="if (this.value == "") {this.value = "email address here";}" onfocus="if (this.value == "email address here") {this.value = "";}" value="email address here" type="text" />
<input type="hidden" value="MyBlogFeedName" name="uri"/><input type="hidden" name="loc" value="en_US"/>
<input class="hl-emailsubmit" value="Submit" type="submit" />
</form>
</div>[/html]
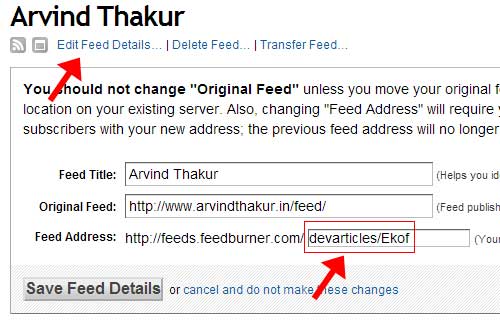
STEP FORU – Now, replace MyBlogFeedName with the exact name of your blog feed in the pasted content. The following figure could help you in finding the name of your feed. The blog feed name of this blog is devarticles/Ekof as shown the in figure below.
Once you have replaced the blog feed name within the HTML (at two place) click the Save button. Next, click the Save Arrangement box at top of the page. Open your blogger home page. The “Subscribe via Email” box should appear something like the following: