In order to create a Child Theme in WordPress follow following steps –

Step 1. Create a Child Theme Folder in Your Site’s Root Directory
Use an FTP client or your hosting provider’s control panel to access your WordPress site’s root directory. In the directory, navigate to the /public_html/wp-content/themes folder.
Look for the + Folder option in the menu bar and click it to create a new folder.
Now, name this folder. We’re using hello-elementor as the parent theme, whose folder in the root directory is named hello-elementor.
Therefore, we’ve named our child theme folder hello-elementor-child. This makes it easier for us to recognize the child theme and differentiate it from the original theme.

Finally, click the Create New Folder button, and a child theme folder will be created in your WordPress installation.
Step 2: Create a CSS Stylesheet File for the Child Theme
The next step is to create WordPress child theme CSS, a file that will store the CSS stylesheet for our child theme. You can click the + File icon in the menu to create a new file in your hosting control panel.
Make sure to create this file in the child theme folder.
Now, name the file as style.css. Finally, click Create New File to finish the process. This file will contain all the necessary information about your child’s theme and act as its primary stylesheet.
If you’re using an FTP client, use the Notepad app on your computer to create the CSS file. You can then upload it to the child theme folder in your WordPress installation.
Step 3. Edit the CSS Stylesheet File
Right-click on the newly created CSS file and select the Edit option from the context menu. The file will open as a blank file in a new tab.
Copy the text written below and paste it into your CSS file:
/*
 Theme Name:   Hello Elementor Child
 Theme URI:    http://example.com/hello-elementor-child/
 Description:  Hello Elementor Child Theme
 Template:     hello-elementor
 Text Domain:  helloelementorchild
*/
Next, click the Save Changes button at the top right corner to save the file.
Step 4. Create Functions File for the Child Theme
Now, we need to create a PHP file named functions.php in the child theme folder.
This file stores the wp_enqueue script, which is needed to ensure that the child theme can inherit the parent theme’s properties without any issues.
So, create functions.php file and add the following code within it:
add_action( 'wp_enqueue_scripts', 'my_theme_enqueue_styles' );
function my_theme_enqueue_styles() {
    wp_enqueue_style( 'parent-style', get_stylesheet_directory_uri() . '/style.css');
}
Once done, save the file and move on to the final step.
Step 5. Activate the Child Theme
Now that your theme is ready, you may wonder how to use the child theme in WordPress. To use the child theme, you must activate it in WordPress.
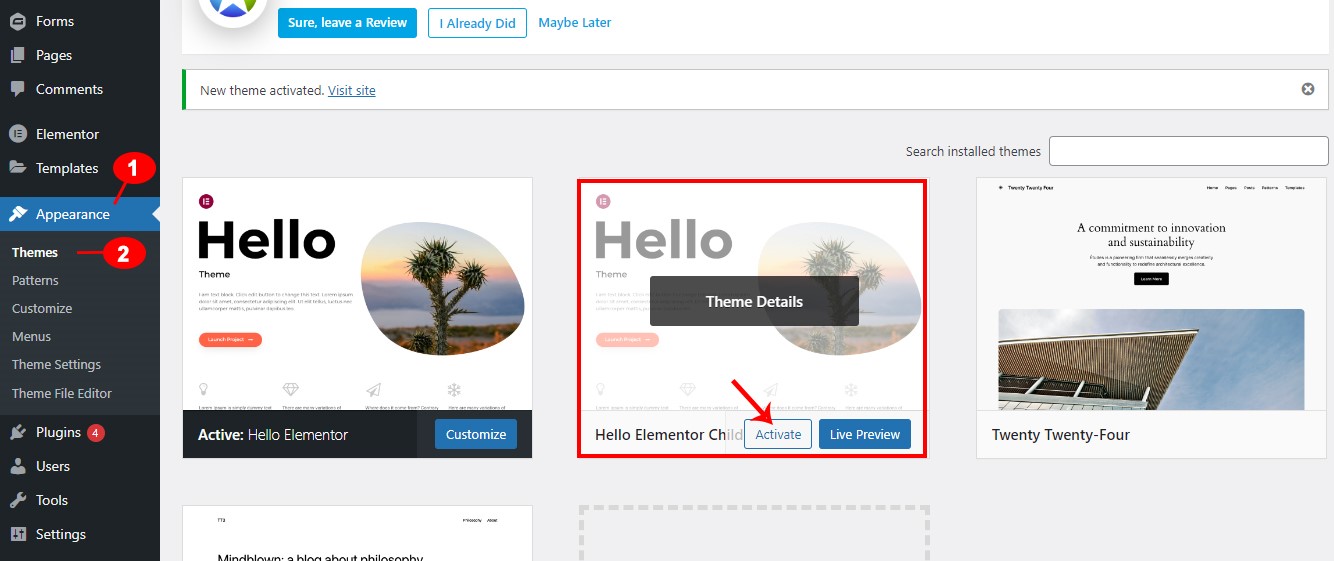
First, log in to your WordPress admin panel. Then, head over to Appearance > Theme.
Look for your child theme and click the Activate button to use it on your website.

Read Also :-
how to create copy to clipboard in react native
Create a Simple To-Do List in React.js