In this tutorial, I will walk you through the entire process of publishing a ReactNative Expo Mobile App. In the tutorial, we will use Expo for building and publishing ReactNative App.
Challenges in Publishing a ReactNative Expo Mobile App
In the mobile application development lifecycle submitting and publishing an Expo ReactNative app to app stores is a challenging and time consuming process. If you are a first timer you should be prepared to face certain challenges which are mostly related to the preparation and execution of steps laid out by a particular publishing platform. This whole process might consume hours so allow ample time beforehand to your app publishing schedule.
Note: This tutorial straight-forwardly focus on the steps involved in the publishing of app. However it does not cover app stores’ fundamental and semantics related to publishing. You should read some good articles on app submission guidelines such as this before you try your first submission.
Let’s get back to the tutorial. In this tutorial I will show you:
- How to build standalone apps,
- What are the requirements and app signings
- Other important things which makes the publishing process easier.
REQUIREMENTS
While this tutorial is about building and publishing react native app built using Expo I assume that you have got expo-cli installed already. So if you haven’t installed it yet – go and do it now!
First of all, you need developer accounts for building iOS app and publishing iOS and Android apps to respective app stores.
Creating Developers Accounts:
- iOS – To build and publish app.
- An Apple Developer account is needed to build an iOS standalone app and to publish it to the stores.
- Android – To publish app
- In case of Android it is little bit different. You need a developer account only to submit an app to the store. You do not need developer account to build the app and Expo takes care of it on its own.
- iOS – To build and publish app.
Install EAS
EAS Build is a hosted service for building app binaries for your Expo and React Native projects. Expo Application Services (EAS) are cloud services for Expo and React Native apps from the team behind Expo. EAS not only builds submittable binaries but it also submits these binaries to Apple and Google play stores. Submission service can be availed as a premium service however.
Use the following command will install EAS globally.
npm install -g eas-cli
Once installed login to EAS using your Expo details
eas login
Once logged in the following command should show your expo username
eas whoami
After this configure the eas to build
eas build:configure
You should choose one of All, iOS and Android options asked under “Which platforms would you like to configure for EAS Build?” question.

Update App Configuration (app.json)
The very first step before publishing the Expo app is to have required information in your app’s app.json file. The mandatory parameters are: name, icon and version. For iOS build you need to have a bundleIdentifier and a buildNumber. For Android you need to have package and versionCode.
The Expo team suggests adding also slug – it represents a piece of url for our app. You can add more information to app.json (like release channels) but describe only the ones required.
Example:
{
  "expo": {
    "name": "My Test App",
    "icon": "./assets/icon.png",
    "version": "0.0.1",
    "slug": "example-name-app",
    "owner": "Inimist",
    "ios": {
      "supportsTablet": true,
      "bundleIdentifier": "com.example-name.app"
    },
    "android": {
      "package": "com.example-name.app",
      "versionCode": 1,
      "useNextNotificationsApi": true,
      "googleServicesFile": "./google-services.json",
      "permissions":[]
    },
    "orientation": "portrait",
    "splash": {
      "image": "./assets/splash.png",
      "resizeMode": "contain",
      "backgroundColor": "#ffffff"
    },
    "updates": {
      "fallbackToCacheTimeout": 0
    },
    "assetBundlePatterns": [
      "**/*"
    ],
    "web": {
      "favicon": "./assets/favicon.png"
    },
    "notification": {
      "icon": "./assets/icon.png"
    }
  }
}
As shown in the example above, other important parameters are name, icon, spalsh and slug. Fill appropriate valid values in all of these.
App Permissions (optional*)
(*This option is required if your App uses media services, such as accessing Photo Library, Camera, Audio/Video and Bluetooth services of a devices.)
When developing a native app that requires access to potentially sensitive information on a user’s device, such as their location or contacts, the app must request the user’s permission first. For example, to access the user’s media library, the app will need to run MediaLibrary.requestPermissionsAsync.
For example if you need to allow your app to click photos from your iOS device you need to specify the following permissions in your app.json’s expo.ios.infoPlist key:
{
  "expo": {
    "ios": {
      "infoPlist": {
        "NSCameraUsageDescription": "This app uses camera to scan barcodes.",
        "NSPhotoLibraryUsageDescription": "This app uses the photo library to upload photos of customers."
      }
    }
  }
}Configure EAS Build with eas.json
"build" key. A minimal eas.json may look something like this:{
"build": {
"development": {
"developmentClient": true,
"distribution": "internal"
},
"preview": {
"distribution": "internal"
},
"production": {}
}
}There are two main types of build, development and production. Since we are going to submit this to app stores we will choose production option, which by default is choosen automatically when you run the build command without specifying –profile option.
google-services.json for Firebase (Push Notifications)
In brief, if you use push notification service in your Android app you need to create a Firebase account and download google-services.json file with necessary information. To create a google-services.json file, follow the following guide closely. If you do not use push notifications in your mobile app you can skip this step entirely.
(Firebase Cloud Messaging is required for all Android apps using Expo SDK, unless you’re still running your app in the Expo Go app)
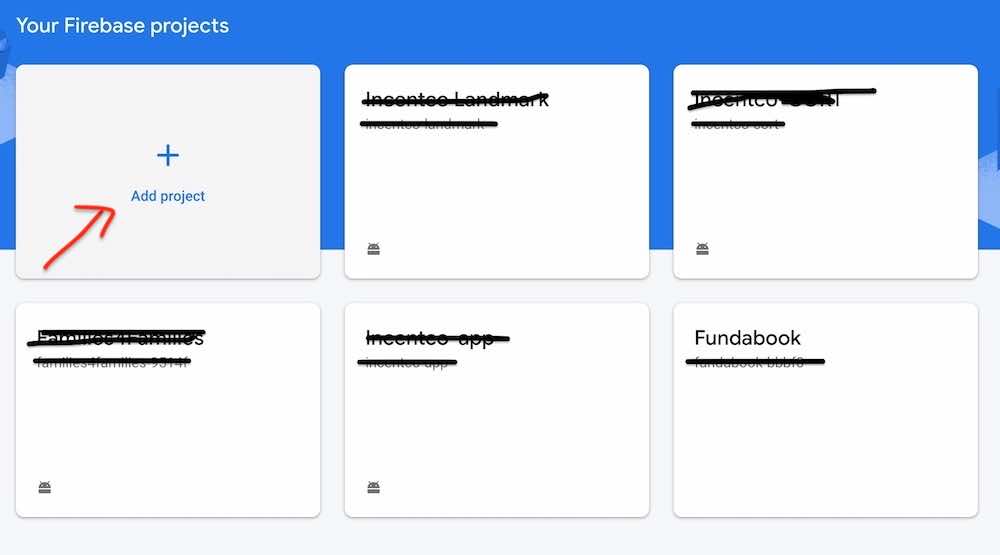
On https://console.firebase.google.com click Add Project and then follow steps to create a new project for your app.
Once project is created you should be redirected to the project screen itself, as shown in the picture below:

Click on the Android icon as shown in the picture above. On next screen enter your app details. The only required field is package name, which is exactly same name as you specified in your app.json file under expo > android > package parameter. Give a name to your configuration file and click Next.
On next step you should be shown a Download button to download google-services.json file. Download it and place it at the root folder your app.
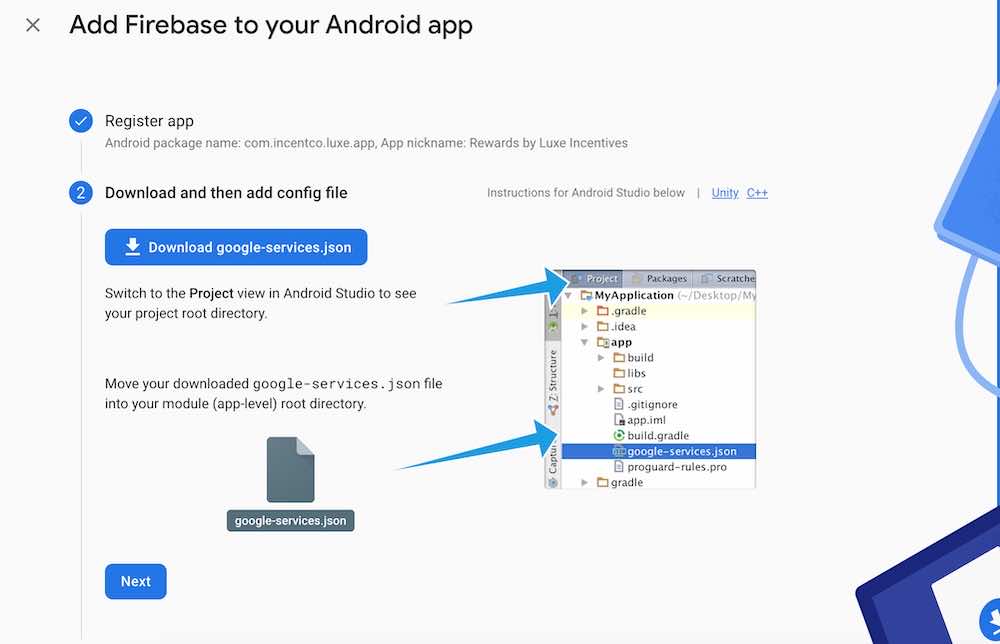
Once the google-services.json file is placed in the root folder add a new parameter named googleServicesFile to your app.json‘s expo > android values, that is:
{
  "expo": {
    ...
    "ios": {
      ...
    },
    "android": {
        "package":"com.example-name.app",
      ...
      "googleServicesFile": "./google-services.json",
      ...
    },
...
}
Related Articles: Using FCM for Push Notifications in a React-Native Mobile App
BUILDING A PACKAGE for ReactNative Expo Mobile App
At this point you should be ready to create your first build.
In the first step we will build an Android build for Google Play Store.
As mentioned earlier in this post, you will need Apple Developer Program membership for building iOS app and Google Play Developer membership for publishing Android apps.
So let’s build our first app package. Run:
eas build --platform android
✔ Using remote Android credentials (Expo server)
? Generate a new Android Keystore? › (Y/n)
I will use Expo to generate keystore for my app so I will press Y. If you want to choose different option for some reason please check this Expo Guide.
Once selected it should upload your bundle to Expo server and show the following message:
✔ Using remote Android credentials (Expo server)
✔ Using Keystore from configuration: Build Credentials -xxxxxxx (default)

Compressing project files and uploading to EAS Build. Learn more: https://expo.fyi/eas-build-archive
✔ Uploaded to EAS 12s

Build details: https://expo.dev/accounts/[youraccountname]/projects/[your-app-name]/builds/[a build number]

Waiting for build to complete. You can press Ctrl+C to exit.
⠙ Build in progress...
If everything goes good it should create a build in a few minutes, the time depends upon the load of tasks on the Expo server.
Waiting for build to complete. You can press Ctrl+C to exit.
✔ Build finished

🤖 Android app:
https://expo.dev/artifacts/eas/[buildname_random_name].aab
Download this file from the link and save it to your local folder. You can also download this file from expo website, under your account. I will download .aab file and use it to submit in steps to follow after Set up your app step.
In the next step we will submit our app build to Google Play Store.
Set up your App for Google Play Store
Go to Google Play Console and choose appropriate Developer Account or create one

On All Apps screen click on Create App button ![]()
Name your app, choose appropriate options and click Create app button at bottom right.
Under Set up your app title complete tasks in order
- Set privacy policy

- App access
In this step, if your app uses login to view some areas of your app, you need to give them a working username/password combination so that they can review private areas. For this you can create a test user in your app with all the privilidges to view all your private screens and areas of the app. You can leave the instructions as well. - Ads
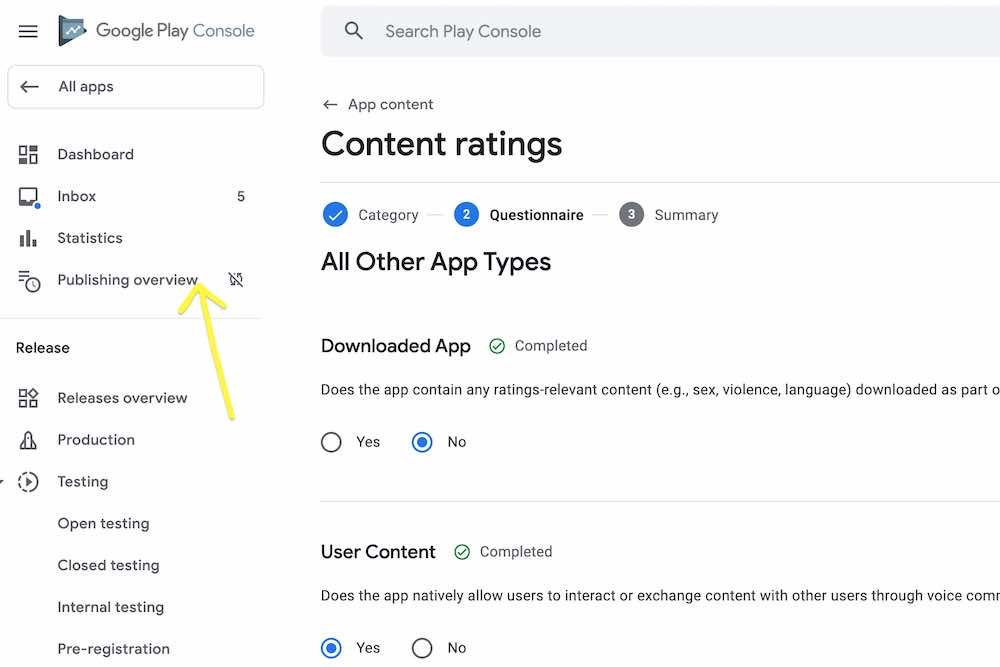
In this step you will let them know whether your app contains ads. A simple Yes and No question. - Content ratings
In this step you complete a content rating questionnaire to receive official content ratings for your app. - Target audience
In this step you complete a simple questionnaire tell about the target audience such as age group, appeal to children etc, of your app. - New apps
Simple Yes/No question whether your app is a News app. - COVID-19 contact tracing and status apps
During pandemic this question is also asked by Google Play Store. This may disappear in future, I hope so :) - Data safety
Information and questions about Data Safety - Select an app category and provide contact detailsSelect app category, tags and provide your contact details
- Main store listingUnder Main store listing there are App Details and Graphics sections. App Details has App name, Short description, Full description fields while Graphics sections have various including App Icon, Featured Graphic and various screen sized screenshots of your app. Upload all required graphics by following size instructions given under each field.For example, for Phone screenshots you should create a phone screenshot, dimensions of which are between 320px and 3840px. It means that your screenshot can have any width and length but it should fall between this range only. Unlike iOS requirements which requires you to provide screenshots in exact width and height, Google Play Store gives you liberty to choose between the given range or pixels.I use iOS simulator to create those screenshots using iPhone 6.5 inch display and iPad 12.9 inch simulators.Once you create and submit these screenshots you should be ready for next step.
- Set privacy policy
Content Rating
Submit your app to Google Play Store
This is the step to upload your .aab build you downloaded from expo.
In the Google Play Console click Production link under Release tab.
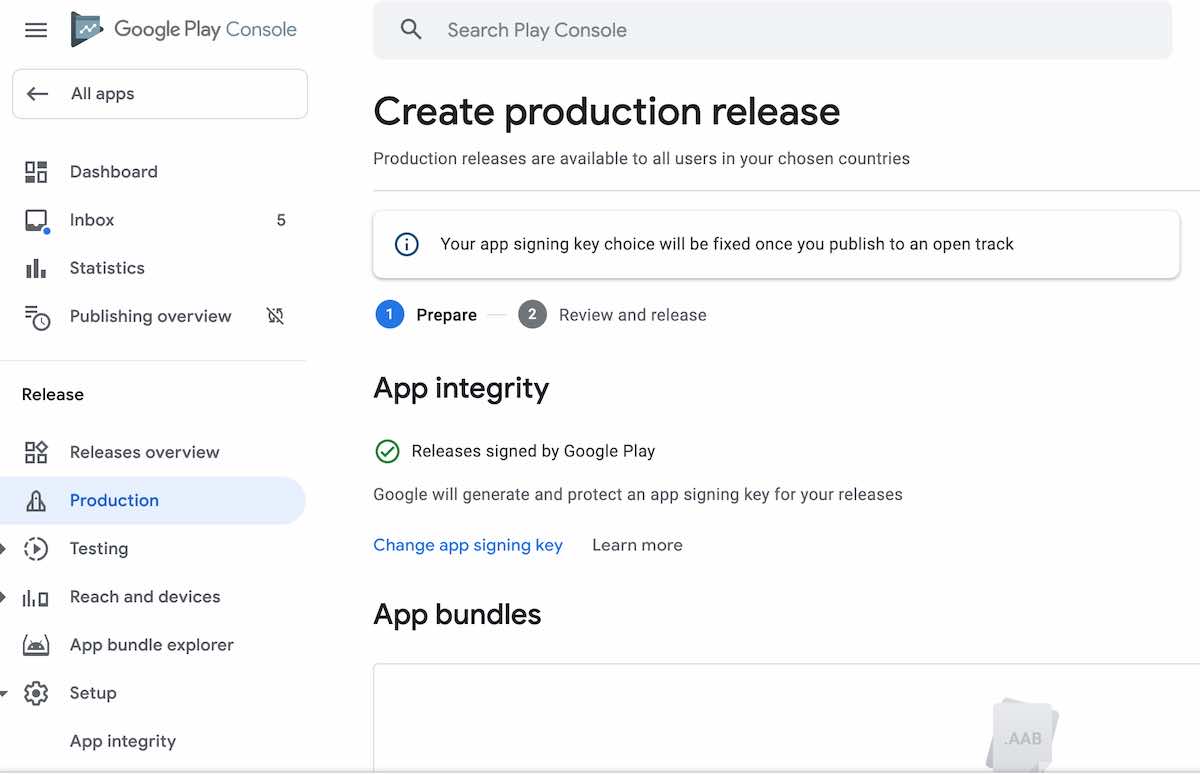
Under App Bundles upload your your .aap bundle.
Once upload it complete, go to Countries/Regions tab and set your targeted countries or regions.
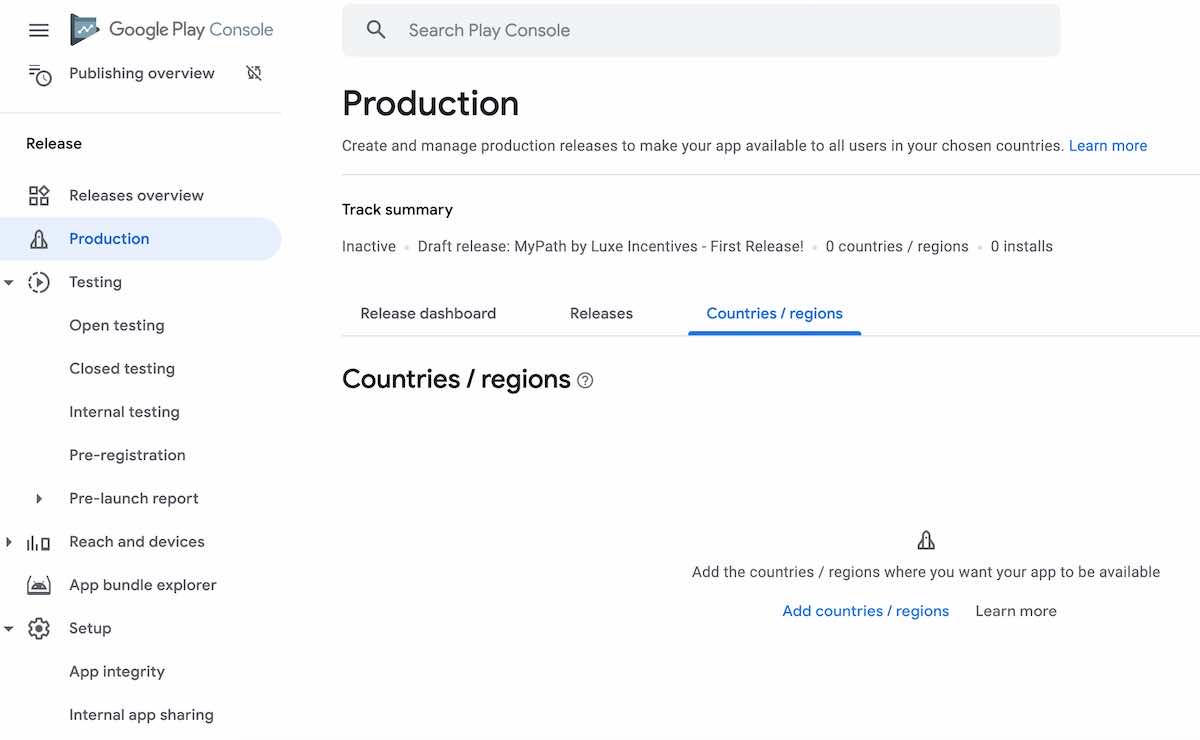
Once target countries/region are set go back to app dashboard of the app and click on the Review Release button
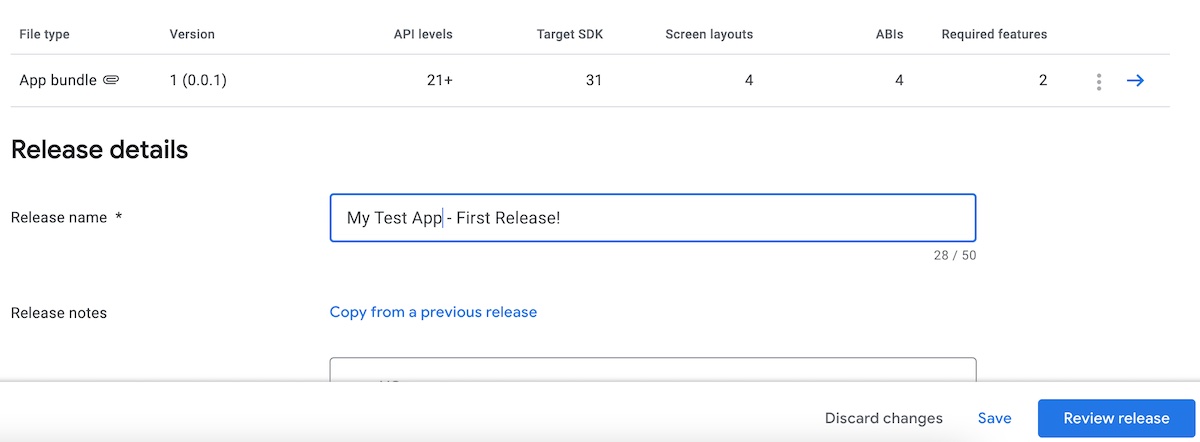
If everything goes right you should see Start rollout to production button at the bottom right. Once you click this button your app will be submitted for a product rollout review. It normally takes 24-48 hours for a new app to get reviewed and hopefully accepted. If there are any issue with your app Google team would notify you about the issues and advise you to correct them and re-submit.
Submitting App to Apple Play Store
In out next steps we will build an iOS app bundle and submit your iOS ReactNative Expo Mobile App to Apple Play Store.
The process to submit an app to App Play Store is bit harder and more time consuming. However if you stick to guidelines it will be adventurous and smooth eventually. So lets start.
Build iOS App Bundle
Similar to the command we ran for android build we will run eas command to build ios bundle.

Arvinds-MacBook-Pro:testapp inimist$ eas build --platform ios
✔ Using remote iOS credentials (Expo server)

If you provide your Apple account credentials we will be able to generate all necessary build credentials and fully validate them.
This is optional, but without Apple account access you will need to provide all the missing values manually and we can only run minimal validation on them.
? Do you want to log in to your Apple account? › (Y/n)
Follow the instructions displayed on your screen to:
Login – login with your apple account
Select Developer Account – Select your apple developer account, it could be your own personal account or any other developer account you may be a contributor for.
Generate a new Apple Distribution Certificate? – Yes
Generate a new Apple Provisioning Profile? – Yes
Need help with building iOS bundle first time? Contact me
Once all these console actions are completed the expo eas should upload your iOS app files bundle to expo server for building an iOS package. We will download this package later when it is built and ready to download.

Create an App for iOS build on Apple App Store
Our next step is to upload the iOS build to Apple App Store. While our build is in progress we can create a new App on Apple Store Connect and fill necessary information.
- Login to Apple Store Connect.
- Choose appropriate developer account from top right menu showing under your name.
- Click New App link under + icon
- Fill the required information in Create App Window
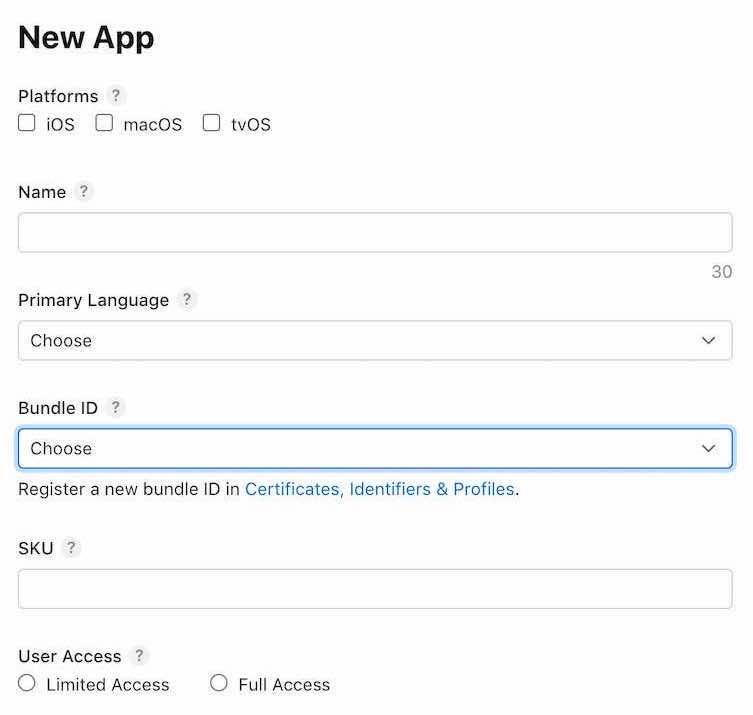
All fields are mandatory. Choose platform, your app name, Language, Bundle ID, SKU and User Access- Name: Enter the name of your app as it will appear in the App Store (note that this is not the name that appears under the icon—that is set in the mag+ Publish Portal).
- User Access: Access you want to give to use the app.
- Primary Language: This should be set to the language used in your app.
- SKU Number: A unique identifier for your app that is only used in reports.
- Bundle ID: Select the ID that was automatically generated when you created your App ID. Once it has been selected, you will be unable to change it for this app. If you did not yet create a Bundle ID, this option will be unavailable.Note: One thing worth noting here is this that when you develop your app in local environment and run it in XCode it would generates Bundle ID automatically for your App, provided you have enabled any “capability” in your app. So if you have developed and tested XCode your Bundle ID field has that option in the dropdown list.Follow the following step if you need to create Bundle ID manually
- Creating Bundle ID for your app
Under Certificates, Identifiers & Profiles you create create a bundle ID for your new app.
While creating the bundle ID provide your package name to match the bundleIdentifier specified in your app.json file under expo.ios.bundleIdentifier settings.
Once created, copy the bundle identifier to your clipboard.
- Creating Bundle ID for your app
- Click Create button to create App ID. Once created you should find yourself on App Dashboard screen. On this page you need to complete all the required sections before you can submit your app for a review.
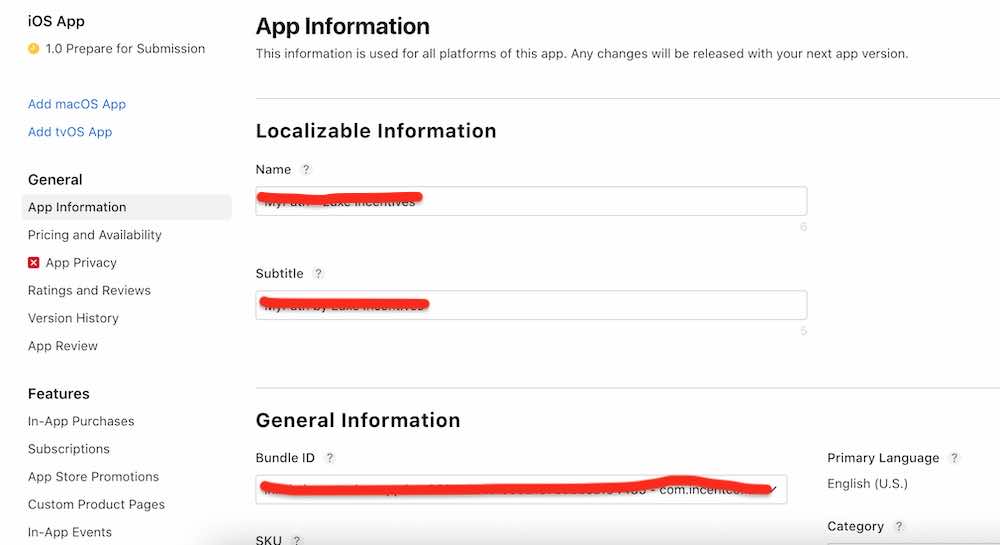 Select Category, and other information asked on this page.
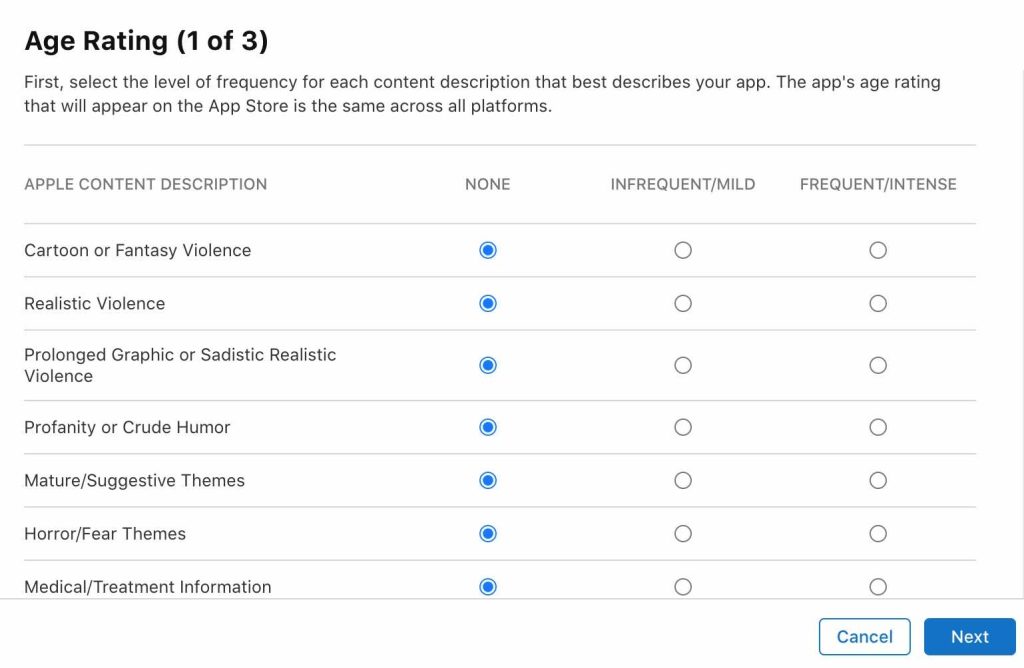
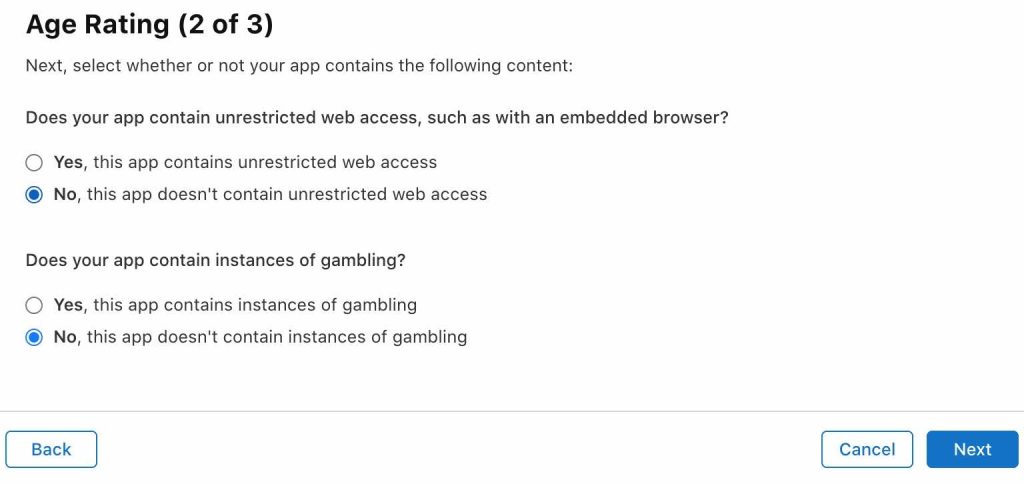
- Complete Pricing and Availability section
- Complete App Privacy section
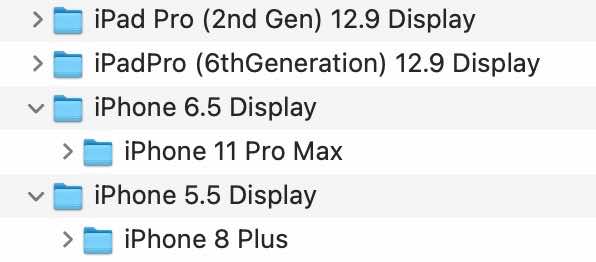
- Upload Screenshots (see figure below)
 I am attaching a guide to generate screenshots required in iOS submission process below. You should pay close attention to the WxH suggested by upload consoles in the picture above. If you upload a screenshot with wrong WxH it will show you the error and correct WxH required. So make sure your simulator device is generating correct screenshots with required WxH dimensions.
Upload iOS build on Apple App Store
In next step we will select the build. But before that lets upload the iOS build to apple connect store first.If you have not generated an App Store Connect API Key yet, you can let EAS CLI take care of that for you by signing into your Apple Developer Program account and following the prompts. You can also upload your own API Key or pass in an Apple app-specific password.Within your app folder run:
eas submit --platform ios
It should complete with a link to the .ipa build.
✔ Build finished

🍎 iOS app:
https://expo.dev/artifacts/eas/xxxxxxxxxxxxxxxx.ipa
Copy this link and run:
eas submit --platform ios
Complete the further questions to Login to Apple, Select a Team, and providing credentials. In my case I use Apple specific Password.
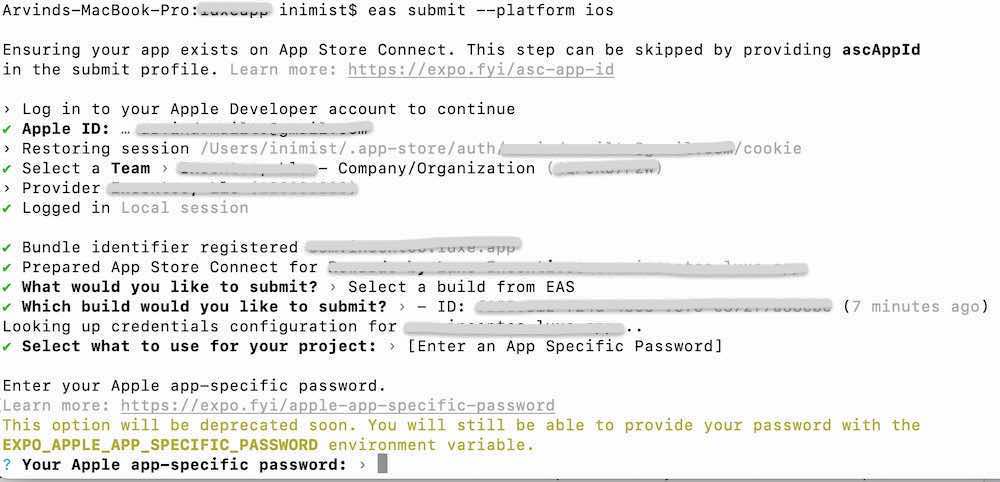
If all goes good it should upload your build to apple Apple Store Connect in a few seconds.
Waiting for submission to complete. You can press Ctrl+C to exit.
✔ Submitted your app to Apple App Store Connect!

Your binary has been successfully uploaded to App Store Connect!
- It is now being processed by Apple - you will receive an email when the processing finishes.
- It usually takes about 5-10 minutes depending on how busy Apple servers are.
- When it's done, you can see your build here: https://appstoreconnect.apple.com/apps/xxxxxxxxx/testflight/ios
It will take some time for your App to appear under your App Account in Apple Store connect.
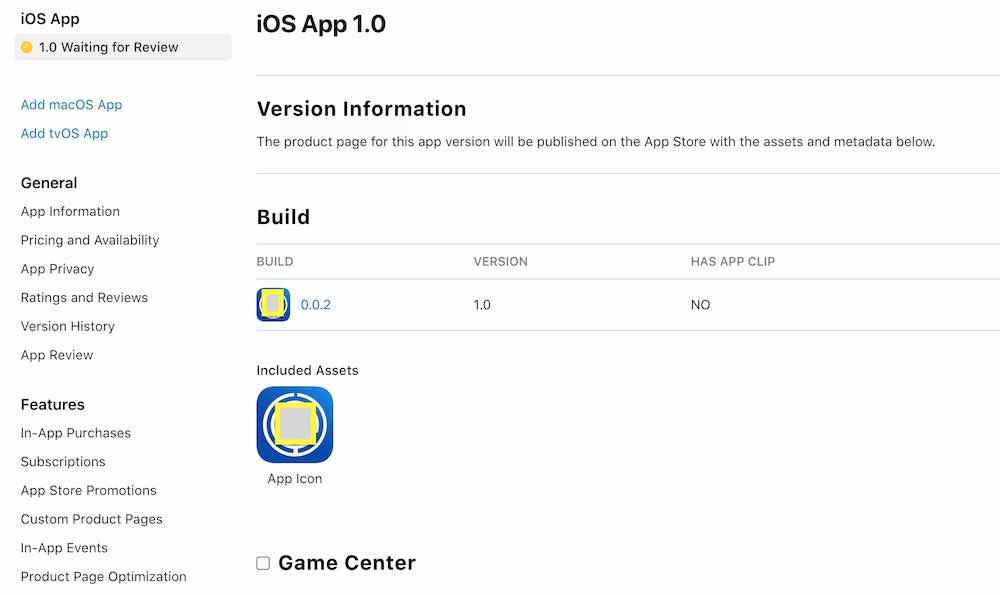
Once your app is visible in your Apple Store Connect, under Builds section you are ready to submit review.
Submit iOS App for Review
- Although your app is now ready to be submitted, make sure that you have complete all the required sections in your app in the App Store Connect before submitting your app for a review.The Sumit Review button found at the top right of your app dashboard

If everything goes good your app should be approved within 24-48 hours of your submission.
Bottlenecks
If you get rejection email from Apple please follow the instructions closely and resubmit. There are various reasons for rejection. Some are related to the app information, data content and privacy, screenshots etc which can be rectified in App Store Connect and do not require a rebuild of the app. Once you update those details you can Submit your app for Review again.
Some issues are related to app configuration, for example missing or wrong icon file, missing compliance or app information in your app.json. In such cases you need to rebuild and resubmit your ReactNative Expo mobile app with new build.
Version Number Mistake
When rebuilding one of the most common mistake is to build with old version number, that is the versionCode for Android and buildNumber for iOS. Do not forget to increment this variable before rebuilding.
Conclusion
In this tutorial I have shared a step by step guide to submit an Expo ReactNative app to Google Play Store and Apple Store. I hope I have covered as many things as required to build and submit ReactNative Expo Mobile App to Google and Apple play stores. If you feel this article useful please share it.