Query ID in Elementor :- Elementor is a powerful page builder for WordPress that allows users to create stunning layouts. One of the advanced features it offers is the ability to filter posts using Query IDs. This can be incredibly useful when you want to display specific content based on certain criteria, such as custom post types or relationships between posts. In this blog post, we’ll explore how to implement this feature with a practical example.
What is a Query ID?
In Elementor, a Query ID is a unique identifier that allows you to modify the default query used to fetch posts. By using hooks, you can customize which posts are displayed in your Elementor widgets, such as the Posts widget or Archive widget. This enables you to create dynamic content tailored to your needs.
Setting Up a Query ID
Let’s go through an example where we’ll filter posts to show only specific post types that are children of the current post.
Hooking into Elementor with Query ID
To filter posts, you can use the elementor/query/{query_id} hook. Replace {query_id} with your unique identifier (e.g., experience_sub_pages).
Here’s a code snippet you can add to your theme’s functions.php file:
add_action( 'elementor/query/experience_sub_pages', function( $query ) {
    // Get the current post ID
    global $post;    // Set the query to fetch posts with post type of 'custom-post-type1' and 'custom-post-type2'
    $query->set( 'post_type', array( 'custom-post-type1', 'custom-post-type2' ) );
    // Fetch posts that are children of the current post
    $query->set( 'post_parent', $post->ID );
});
In this example:
- We use global $post to access the current post.
- The set method is called on the $query object to specify that we want to fetch posts of custom-post-type1 and custom-post-type2.
- We also specify that we want posts that are children of the current post using post_parent.
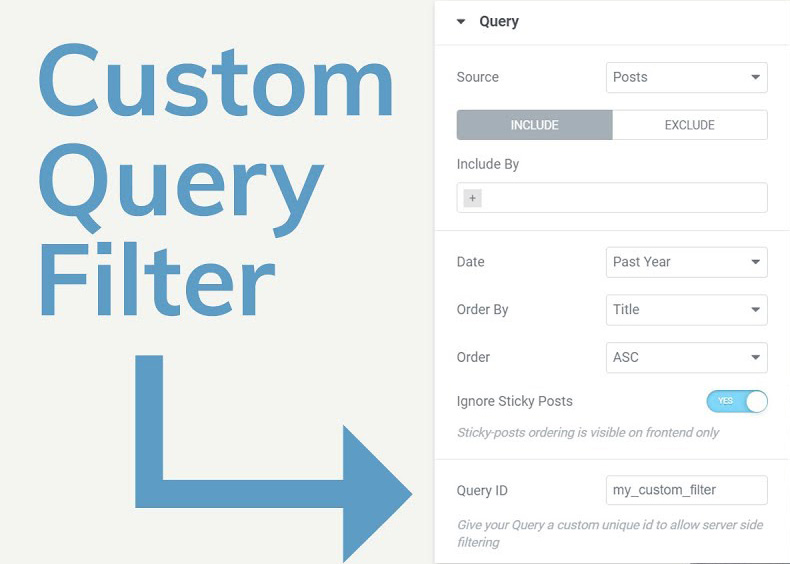
Using the Query ID in Elementor
After adding the above code, you need to set up your Elementor widget to use the custom query.
- Open the page where you want to display the posts.
- Drag the Posts widget into the section.
- In the Query settings of the widget, look for the Query ID field.
- Enter experience_sub_pages as the Query ID.
Save and Preview
Once you’ve configured everything, click Update to save your changes. Preview the page to see your custom post filtering in action!
Read Also:-
How to Setup Daily and Weekly Backup Cron on Linux server
Also Visit:-