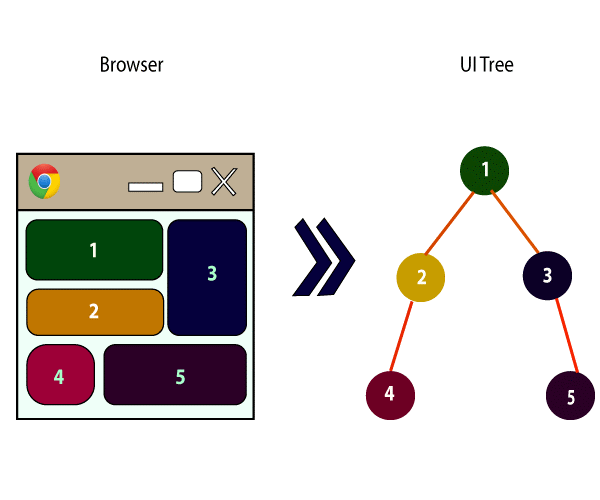
React is a JavaScript Library known for front-end development (or user interface). It is popular due to its component-based architecture, Single Page Applications (SPAs) and Virtual DOM for building web applications that are fast, efficient, and scalable.
Why Learn React JS
React, the popular JavaScript library, provides reasons for developers to learn it: flexibility, great developer experience, strong support from Facebook, and vast community support.

1) It’s just a view Library
React is not another MVC framework, or any other kind of framework. It’s simply a library for rendering your views. If you’re coming from the MVC world, you need to realize that React just is ‘V’, Part of the equation.
2) Keep your components small
Breaking your UI into small, reusable components makes your React application easier to read, maintain, and scale.
Example
const LatestPostsComponent = props => (
      <section>
        <div><h1>Latest posts</h1></div>
         <div>
          { props.posts.map(post => <PostPreview key={post.slug} post={post}/>) }
        </div>
      </section>
);
The component itself is a <section>, with only 2 <div>s inside it. The first one has a heading, and the second one just maps over some data, rendering a <PostPreview> for each element. That last part, extracting the <PostPreview> as its component, is the important bit. I think this is a good size for a component.
3) Write functional components
React components are independent, reusable building blocks in a React application that define what gets displayed on the UI. Previously there were two choices for defining React components, Class Components and Functional Components.
Example
Class Components
         const MyComponent = React.createClass({
          render: function() {
         return <div className={this.props.className}/>;
             }
          });
ES6 classes:-
       class MyComponent extends React.Component {
        render() {
       return <div className={this.props.className}/>;
         }
        };
Function Components:-
      function myComponent(){
       return(
       <>
  <h1>function component</h1>
       </>
       )
      };
ES6 function components:-
    const myComponent = ()=>{
     return(
       <>
      </>
      )
    };
4) Write stateless components
A stateless component is a functional component that does not manage any state. It simply receives props and renders UI based on them.
Example
const Welcome = () => <h1>Welcome to React!</h1>;
State makes components difficult to test.
State makes components difficult to reason about.
State makes it too easy to put business logic in the component.
State makes it difficult to share information with other parts of the app.
5) Use Redux.js.
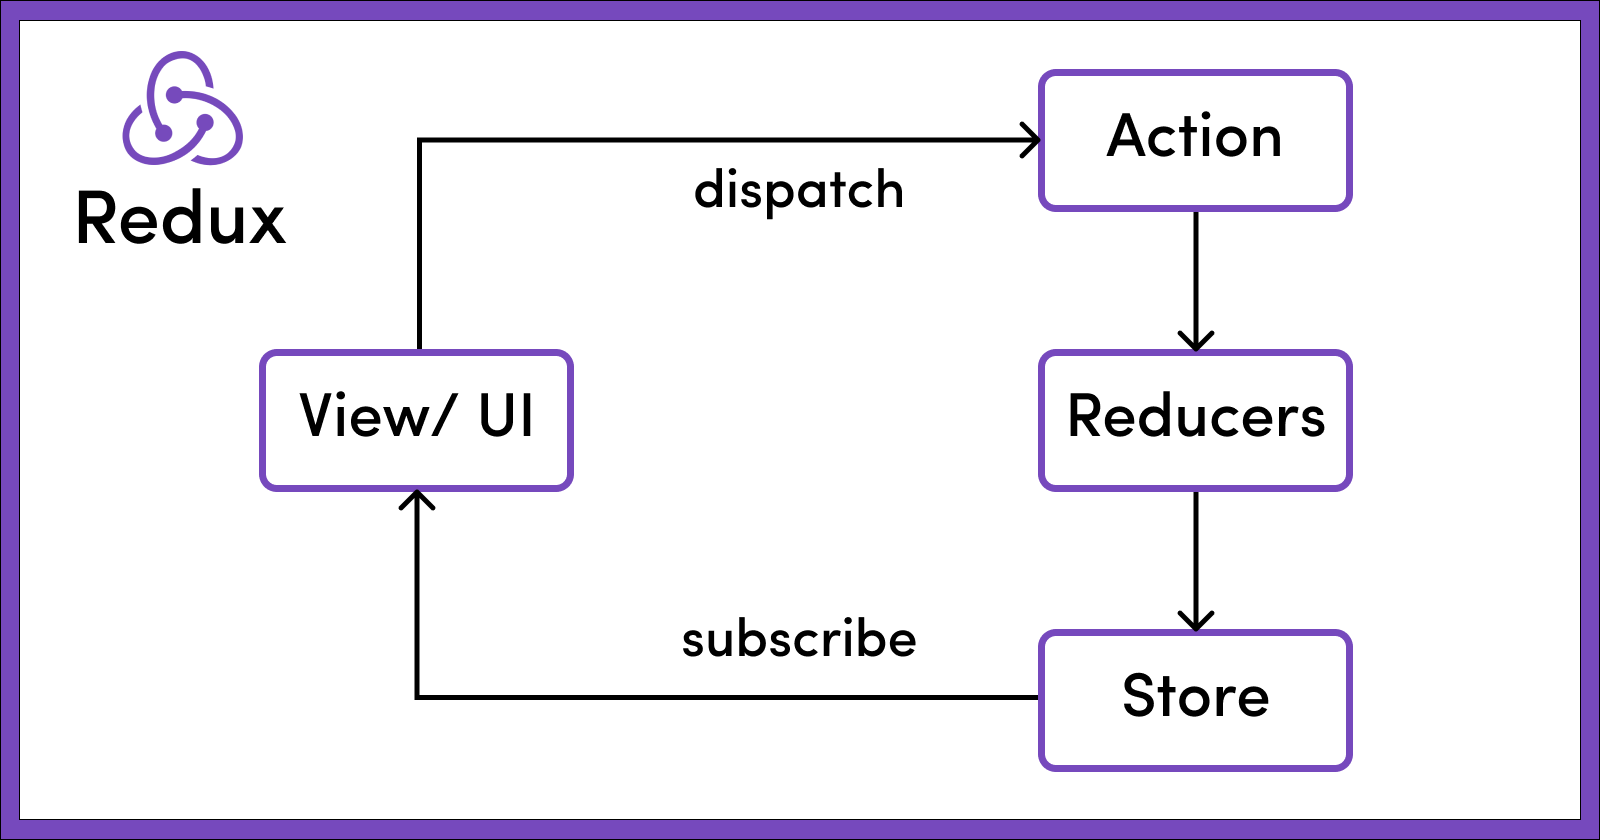
Redux is a state management library for JavaScript applications. It helps manage global state, making it easier to handle data flow in complex applications like React, Angular, or Vue.
- Centralized State Management – All data is stored in a single place (store).
- Predictable State Changes – State updates are handled using pure functions (reducers).
- Easier Debugging – Redux DevTools allow time-travel debugging.
- Scalability – Helps manage large applications efficiently.
How Redux Works
Redux follows unidirectional data flow,
- Store -> Holds the application state.
- Actions -> Describes what should change in the state.
- Reducers -> A function that updates the state based on the action.
- Dispatch -> Sends an action to the store to update state.
- useSelector & useDispatch (React) -> Used to access and modify state in React.
6) Always use prop Types
Prop Types is a built-in type-checking mechanism in React that helps validate the props passed to a component. It ensures that a component receives the expected data types, preventing bugs and improving maintainability.
Why Use Prop Types
- Catches Bugs Early – Prevents passing incorrect data types.
- Improves Code Readability – Clearly defines what data a component expects.
- Enhances Debugging – Shows warnings in the console if props are incorrect.
- Better Documentation – Acts as a self-explanatory guide for components.
Different Data Types in Prop Types:
Types | Example |
| Data Type | PropTypes Example |
| String | PropTypes.string |
| Number | PropTypes.number |
| Boolean | PropTypes.bool |
| Array | PropTypes.array |
| Object | PropTypes.object |
| Function | PropTypes.func |
| Required | PropTypes.string.isRequired |
7) Use shallow rendering
Shallow rendering is a technique used in testing React components where only the
component being tested is rendered, without rendering its child components.
This allows for isolated unit testing of components without dealing with the
behavior of their children.
- Unit Testing – Focuses only on the component being tested.
- Faster Tests – Does not render child components, making tests run quicker.
- Avoids Unnecessary Dependencies – Prevents failures due to changes in child.
When to Use Shallow Rendering
- To test a component in isolation.
- To avoid rendering child components, making tests faster and more focused.
- To check if a component is rendering the expected elements and props.
Example
import React from 'react';
           import { shallow } from 'enzyme';
           import StudentDashboard from '../pages/studentPage/StudentDashboard';

           describe('StudentDashboard Component', () => {
           it('should render StudentDashboard component', () => {
           const wrapper = shallow(<StudentDashboard />);
           expect(wrapper.exists()).toBe(true);
              });
           });
How It Works
shallow(<StudentDashboard />): This creates a shallow-rendered instance of the StudentDashboard component.
wrapper.exists(): This checks if the component is rendered.
When Not to Use Shallow Rendering
When you need to test interactions between a component and its children. When testing deeply nested components that rely on context or hooks.
8) Use Jsx,Es6,Babel,Webpack,and NPM
a) JSX (JavaScript XML)
JSX allows you to write HTML-like syntax inside JavaScript. It makes React code more readable and expressive.
Example
JSX in a React Component::
import React from 'react';

           const Welcome = () => {
           return <h1>Hello, Welcome to React!</h1>;
           };

           export default Welcome;

          ✅JSX Benefit: Instead of writing React.createElement(), you write cleaner code like
          <h1>Hello</h1>.
b) ES6 (ECMAScript 6)
ES6 introduced modern JavaScript features like arrow functions, classes, destructuring, template literals, and modules.
Example
//Arrow function:
          const greet = (name)=>`Hello,${name}!`;

        e.g// Destructuring:
         const user = {name:"kaku", age:23};
         const (name,age) = user;
Example
// Template Literal
         console.log(`User: ${name}, Age: ${age}`);
✅ES6 Benefit: Code is shorter, more readable, and modular.
c) Babel (JavaScript Compiler)
Babel is an open-source JavaScript compiler and transpiler that allows the use of the latest JavaScript(ES6+) features, ensuring compatibility across older and newer browsers. Babel enables React developers to write clean, modern syntax without worrying about browser limitations.
JSX Code (Before Babel):
           const element = <h1>Hello, World!</h1>;


JavaScript Code (After Babel):
           const element = React.createElement("h1", null, "Hello, World!");
✅ Babel Benefit: Older browsers can run modern JavaScript.
d) Webpack (Module Bundler)
Webpack bundles multiple files into a single JavaScript file and optimizes the code.
✅ Webpack Benefit: Combines JSX, ES6, CSS, and assets into a single, optimized bundle.
e) NPM (Node Package Manager)
NPM (Node Package Manager) is the default package manager for Node.js, and it plays an important role in ReactJS development. It is used to manage the dependencies (libraries, frameworks, and tools) you want to include in your project. React itself is distributed as an NPM package, and NPM makes it easy to manage project dependencies and scripts.
How NPM works
NPM allows you to install, update, and manage JavaScript libraries that your project depends on. These dependencies are listed in a package.json file, which helps keep track of all packages required by your project.
NPM commands for ReactJS development
Initialize a Project
When starting a new project, you can initialize npm by creating a package.json file.
NPM init
Install a Package
To install a package like React, use:
NPM install react
Install Development Dependencies
For development tools like Babel or Webpack, you can add –save-dev to install them as development dependencies.
NPM install –save-dev webpack babel-loader
Run a Script
You can define custom scripts in package.json and run them using:
NPM run script-name
9) Use the React and Redux dev tools
React and Redux DevTools help in debugging state changes, component rendering, and Redux store updates in your React application.
Let’s go step by step to set up and use them effectively.
What is React DevTools
React Developer Tools is a browser extension that allows you to inspect React component hierarchies, props, state, and hooks. Redux Toolkit or RTK is a Node package that simplifies the development by providing utility functions. It is made to simplify the creation of a redux store and provide easy state management. It can be easily installed using simple NPM commands.
Problems solved by Redux Toolkit (RTK) in Redux:
Redux Toolkit was created to solve these three common problems that we face in Redux.
a)Too much code to configure the store.
b)Writing too much boilerplate code to dispatch actions and store the data in the reducer.
c)Extra packages like Redux-Thunk and Redux-Saga for doing asynchronous actions.
Read Also:
The trailingslashit() Function in WordPress