SSL certificate is used to protect data shared by websites and applications to make it secured. Secured Socket Layer(SSL works on an algorithm to encrypt data exchanged between browser and server.
An SSL makes data between request unreadable and unbreakable for the interceptors or hackers. Third party services are used to encrypt the data.
Why is it importnat to Install SSL
It is a prerequisite to have an SSL installed on your server if you deal in eCommerce. That is if you allow users to pay or transfer money online. The eCommerce or payment transfer websites and actions are more prone to hacking or data stealing attempts.
For example, a hacker may try to intercept a request on a website to steal credit card information entered via web forms. Also it can steal important information submitted by users which may include your identification numbers, online banking details, personal details, credit card details and many more.
How to get an SSL
There are various online hosting companies and businesses which sell SSL. My favorite one is namecheap.
How to install SSL certificate
This is a step by step guide to install SSL on a self managed website hosting on a server running Linux Operating System running Ubuntu 22.
Step 1
Generate a CSR: Using Openssl
The very first step in installing an SSL on a server is to create a CSR or Certificate Signing Request.
Openssl can be used to create a CSR. Usually it is installed by default if you are using a pre configured server instance on Linux build. You can check if it is install by passing a command:
openssl version
If openssl is installed it should show something like:
OpenSSL 1.0.1g 7 Apr 2014
If openssl is not installed, install it. Most of the times you could use it on your local machine to generate CSR. Installation depends upon your Linux build. For example:
sudo apt install openssl -y
Or in centos
sudo yum install libtool perl-core zlib-devel -y
To install Openssl on Windows go to https://sourceforge.net/projects/openssl/ to download and install.
Step 2
Generate Certificate Signing Request (CSR)
Generate Private Key
In order to generate CSR you first need a RSA private key to encrypt your CSR. So create private key type
openssl genrsa 2048 > mysite-private-key.pem

genrsa – The genrsa command generates an RSA private key.
2048 is the size of the private key to generate in bits which is a default size anyway
Generate CSR
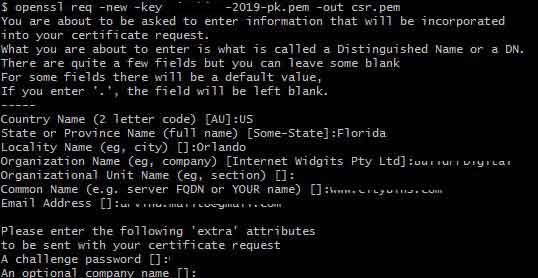
openssl req -new -key mysite-private-key.pem -out csr.pem
It will generate CSR named csr.pem encrypting it with the help of mysite-private-key.pem private key you generated in previous step.
The next console with ask you for some information. The FQDN (shown as: Common Name (eg, fully qualified host name) []) is the most important one. It it your full domain i.e. www.yoursite.com with or without www, exactly whichever you are using for your website.
Generated CSR looks like this one
-----BEGIN CERTIFICATE REQUEST-----
MIIC6zCCAdMCAQAwgY0xFsuye455lVTMRAwDgYDVQQIDAdGbG9yaWRhMRAw
...............
gNfVP4gI9IJ4kA2Soqm7p8E8Xgf8R7mAs/5vNooDHw==
-----END CERTIFICATE REQUEST-----
Step 3
Purchase SSL and Activate it
You can purchase an SSL certificate at namecheap.com or your preferred hosting service provider. Once your purchase is done you are ready to sign the SSL so that it can be installed on your website.
Now goto your name cheap account and enter the CSR in the given field. Once you save it it will ask you to validate your domain by different methods including HTTP, Email or DNS editing method. Pick one of them and validate your domain. Refer to guide of your hosting service provider to “How to activate SSL” or similar terms.
Step 4
Once your SSL is generated and downloaed, upload all files to a secured folder on your server. Generally an SSL includes a crt, a ca-bundle file and sometimes a p7b file.
In my case I upload them to /home/bitnami/ssl/mysite.com/ so I have these three files there. Note that I also have uploaded the RSA private key to same folder in which I placed other files.
/etc/ssl/mysite.com/mysite_com.crt
/etc/ssl/mysite.com/mysite-private-key.pem
/etc/ssl/mysite.com/mysite_com.ca-bundle
The location is not important but the reference to the location is, which you will going to do in the next step.
Step 5
Now look for your apache vhosts config file httpd-vhosts.conf. Mine was in /opt/apache2/conf/extra. Edit this file to include or replace reference to SSL files uploaded in previous step like this
<VirtualHost _default_:443>
    ServerAdmin webmaster@localhost
    ServerName mysite.com:443
    SSLEngine on SSLCertificateFile "/etc/ssl/mysite.com/mysite_com.crt"
    SSLCertificateKeyFile "/etc/ssl/mysite.com/mysite-private-key.pem"
    SSLCertificateChainFile "/etc/ssl/mysite.com/mysite_com.ca-bundle"
</VirtualHost>
Save this file.
Step 6
Restart Apache server using following command or equivalent (Centos in example)
sudo systemctl restart apache2